Authorization
Getting access to Planday’s API is managed by the standard OAuth2 protocol using the Authorization Code flow. To make calls to the Planday API, you first need to create an API application in Planday to hold the required credentials. The application must be authorized for each Planday portal on which the integration will access data.
Customer or Partner?
The authorisation flow depends on which type of integration you are building. Select the right approach and continue reading how your integration should manage the authorisation.
- Customer: I’m a Planday customer or consultant for a Planday customer and I want to build an integration to one or more of my Planday portals.
- Partner: I want to build an awesome integration between my system and Planday that will work for multiple customers.
Authorization flow for customers
Create an application
This guide walks you through how to get started with managing the authorization of your new integration to Planday and how to access data in your Planday portal through the API. You need to be logged in as an Administrator and you need to have the necessary rights to allow access to the data that the integration will want to utilize.
First you need to create your Planday API application, that enables access the API resources in Planday. Login to Planday and follow the steps below.
Step 1
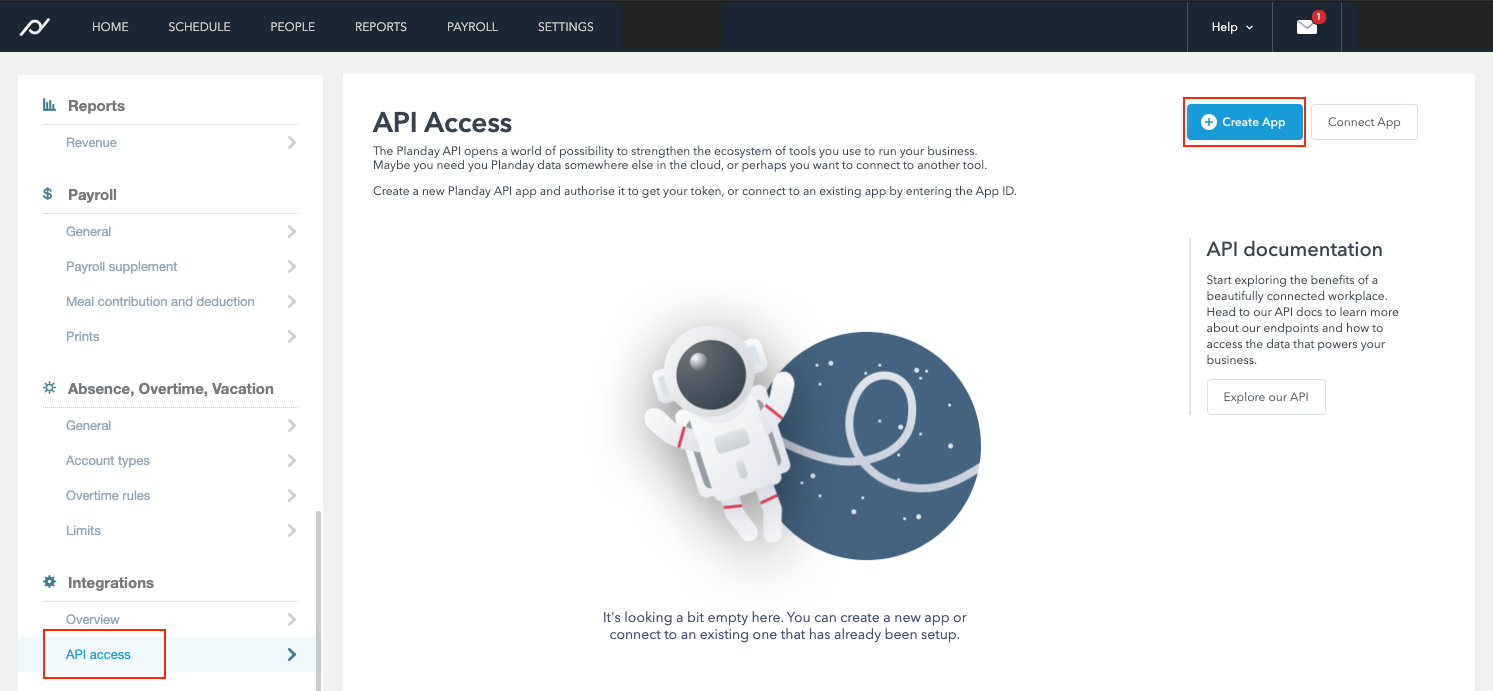
Navigate to Settings > Integrations > API Access. You need to be an Administrator to access this page.
 Step 2
From this page you can retrieve the Client ID and Refresh Token required to build an integration, and access Planday resources. To start:
Step 2
From this page you can retrieve the Client ID and Refresh Token required to build an integration, and access Planday resources. To start:
- Select Create App at the top right of the page.
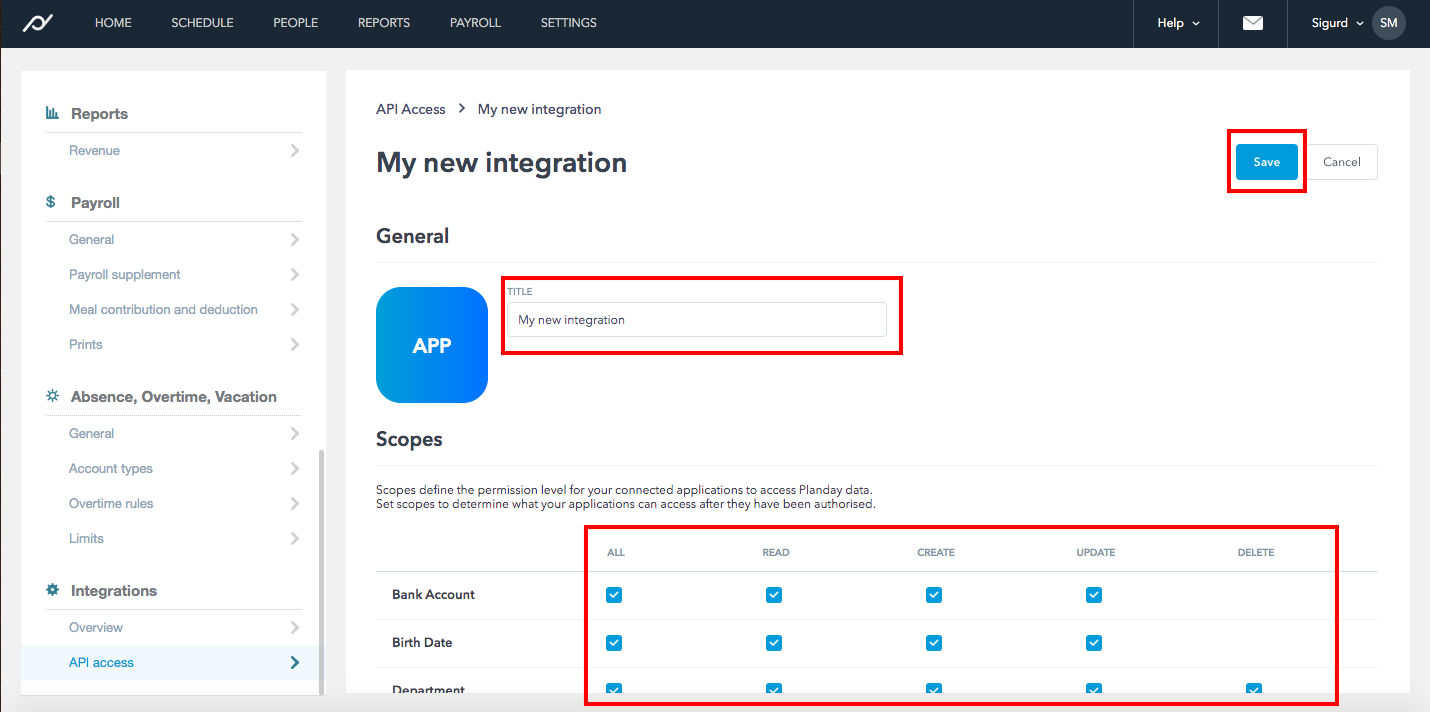
- Next, define the resources or actions that should be accessible to the application under the section “Scopes”. For example, you can create an application which can read schedule data.
- Enter a short name for the application. This name will be visible to you as well as any customers, during authorization.
- Select Save.
 Step 3
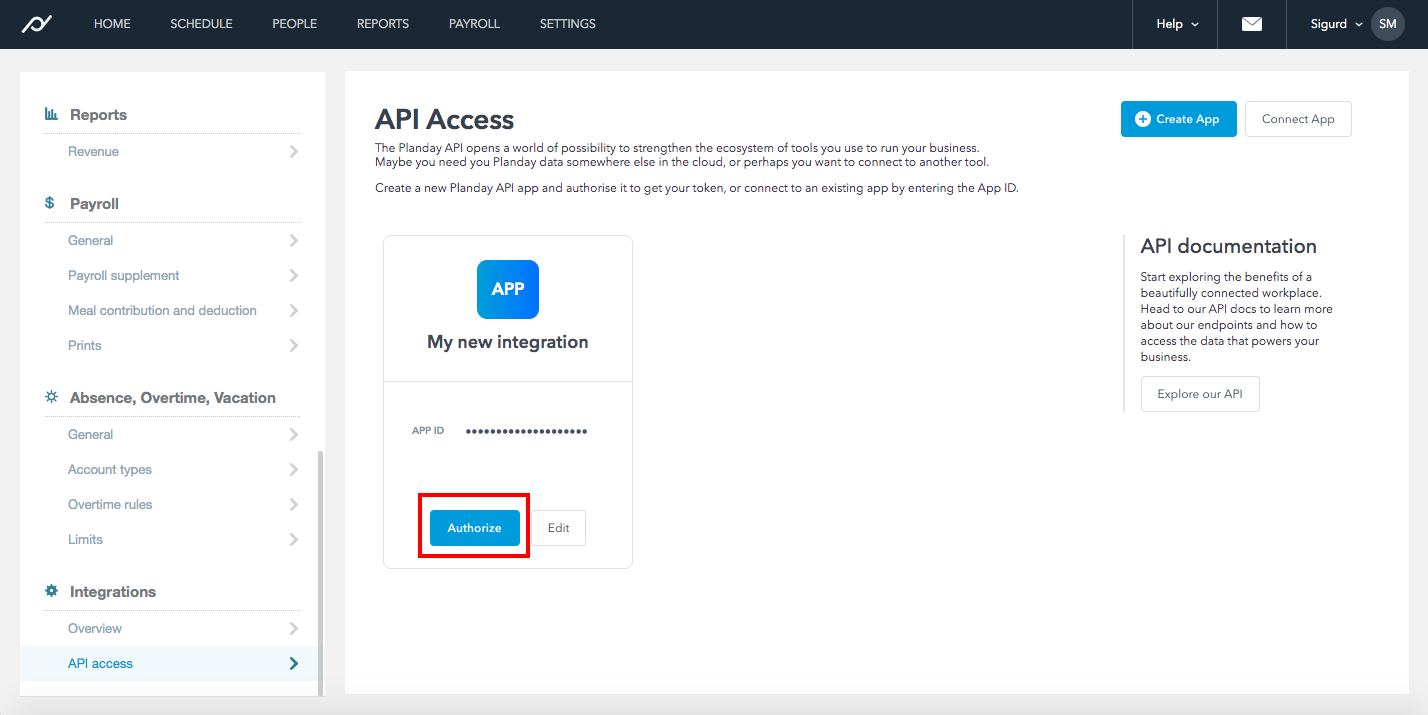
Now your application will be listed on the API Access page. To access the resources for the application, you must authorize the application and generate a Refresh Token. To do so, select Authorize next to the name of the application.
Step 3
Now your application will be listed on the API Access page. To access the resources for the application, you must authorize the application and generate a Refresh Token. To do so, select Authorize next to the name of the application.
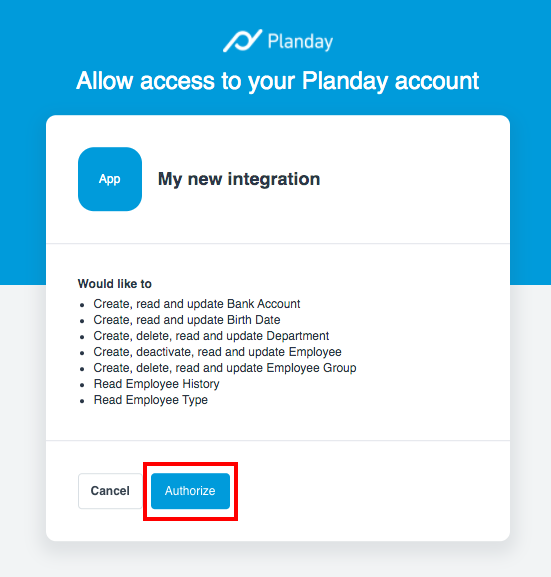
Step 4 You will be redirected to a consent screen where you need to confirm that the application is allowed to access the listed resources from your Planday portal. Make sure you read through the entire list and that you agree to allow this application access to all data listed (If the list is long, you’ll need to scroll down!). The application may gain access to all the data listed here, for all Planday users you administer, which you yourself have access to as an Administrator in Planday. For example, if you have edit rights to all employees’ pay rates and you’re authorizing the application to “Edit pay rates”, the integration will be able to update pay rates for all employees. Select Authorize.
At any time, you can pause or stop the application from accessing the specified resources in Planday by selecting the Revoke button next to the name of the application. Once the application is created, it is also possible to rename or delete it permanently from the API Access page.
Connect an existing API application on other Planday portals
An application can be connected to multiple Planday portals. This is useful in cases where an integration is to be used in several different Planday portals that you administer. To enable the application in a different Planday portal, perform the following steps:
- Open the Planday portal that needs access to the integration and navigate to the API access page (Settings > Integrations > API Access).
- Click the “Connect App” button in the top right of the page.
- Enter the App ID of the application which already exists. You can obtain it by going to the API access page in the portal where the application is created, hovering over the hidden App ID field, and then selecting “Copy”.
- Click the “Save” button. The application should now be listed on the API access page.
- Authorize the application to retrieve the (Refresh) Token. To do so, select Authorize next to the name of the application.
- You will be redirected to the consent screen where you need to confirm that the application is allowed to access the listed resources. Select Authorize.
Repeat the five steps above on the Planday portals you want to connect the integration to. There needs to be an unique (Refresh) Token from each of the portals on which the integration will be used.
Exchanging the Refresh Token for an Access Token
To access the resources defined by an application you’ll need the following:
- CLIENT_ID – this can be found in the “App Id” column on the API Access page
- REFRESH TOKEN – this can be found in the “Token” column on the API Access page. The application has to be authorized.
Before you can make calls to the API resources, you first need to obtain an Access Token by exchanging the Refresh Token from the previous sections for an Access Token. To do this, you need to make a POST request using any tool you want that can make HTTP calls (curl, postman, etc.) The request is as follows (replace CLIENT_ID and TOKEN with appropriate values):
POST https://id.planday.com/connect/token
Request Headers:
Content-Type: application/x-www-form-urlencoded
Request Body:
client_id=CLIENT_ID&grant_type=refresh_token&refresh_token=TOKEN
CURL:
curl -X POST \
--data "client_id=CLIENT_ID&grant_type=refresh_token&refresh_token=TOKEN" \
https://id.planday.com/connect/token
If the request is successful, the response will contain the JSON object with the “access_token” field. This is the ACCESS_TOKEN which can be used to make calls to the API.
Accessing API resources
Each request to the Plandays API must contain two headers:
X-ClientId: CLIENT_ID
Authorization: Bearer ACCESS_TOKEN
You can read more about how to obtain the CLIENT_ID and ACCESS_TOKEN in the Exchanging the Refresh Token for an Access Token section above. On https://openapi.planday.com/ you can find all the information you need to make a call to any Planday Open API endpoint (URL, HTTP Method, Body etc.).
Here is a sample request, which fetches all departments from the Planday portal the application is defined in:
GET https://openapi.planday.com/hr/v1/Departments
Request headers:
X-ClientId: CLIENT_ID
 Authorization: Bearer ACCESS_TOKEN
CURL:
curl -X GET \
-H "Authorization: Bearer ACCESS_TOKEN" \
-H "X-ClientId: CLIENT_ID" \
https://openapi.planday.com/hr/v1/Departments
Authorization flow for Product Partners
Are you a Product Partner implementing an integration that will be available for multiple mutual customers, please read through this article and learn how to manage the authorization flow that enables access to Planday.
The authorization of your integration follows an OAuth2 flow with a bearer token. You have to create and API application inside your Planday demo portal, which will be authorized on each customers Planday portal where the integration will access data. To gain access to a Planday demo account please contact Planday API support on apisupport@planday.com.
Create an application
To create an application you need to be logged in as an Administrator on your Planday demo portal, and you need to have the necessary rights to allow access to the data that the integration will utilize. Start by logging in to Planday and follow the steps below.
Step 1
Navigate to Settings > Integrations > API Access. You need to be an Administrator to access this page.
Step 2
From this page you can retrieve the Client ID and Refresh Token required to build an integration, and access Planday resources. To start:
- Select Create App at the top right of the page.
- Next, define the resources or actions that should be accessible to the application under the section “Scopes”. For example, you can create an application which can read schedule data.
- Enter a short name for the application. This name will be visible to you as well as any customers, during authorization.
- Select Save.
- Congrats, you have now created you application.
Step 3
Your application will be listed on the API Access page. To access the resources for the application on your demo portal, you must authorize the application and generate a Refresh Token. To do so, select Authorize next to the name of the application.
Step 4 You will be redirected to a consent screen where you need to confirm that the application is allowed to access the listed resources from your Planday portal. This is the also how the consent screen will look like when your customers authorizes the integration through the authorization code flow described in the next section Authorization code flow. Now Select Authorize.
At any time, you can pause or stop the application from accessing the specified resources in your Planday demo account by selecting the Revoke button next to the name of the application. Once the application is created, it is also possible to rename or delete it permanently from the API Access page.
Authorization code flow
To read how to manage the authorization code flow, please go to our guide. (Authorisation Code Flow article)
Exchanging the Refresh Token for an Access Token
To access the resources defined by an application you’ll need the following:
- CLIENT_ID – this can be found in the “App Id” column on the API Access page
- REFRESH TOKEN – this can be found in the “Token” column on the API Access page. The application has to be authorized.
Before you can make calls to the API resources, you first need to obtain an Access Token by exchanging the Refresh Token from the previous sections for an Access Token. To do this, you need to make a POST request using any tool you want that can make HTTP calls (curl, postman, etc.) The request is as follows (replace CLIENT_ID and TOKEN with appropriate values):
POST https://id.planday.com/connect/token
Request Headers:
Content-Type: application/x-www-form-urlencoded
Request Body:
client_id=CLIENT_ID&grant_type=refresh_token&refresh_token=TOKEN
CURL:
curl -X POST \
--data "client_id=CLIENT_ID&grant_type=refresh_token&refresh_token=TOKEN" \
https://id.planday.com/connect/token
If the request is successful, the response will contain the JSON object with the “access_token” field. This is the ACCESS_TOKEN which can be used to make calls to the API.
Accessing API resources
Each request to the Plandays API must contain two headers:
X-ClientId: CLIENT_ID
 Authorization: Bearer ACCESS_TOKEN
You can read more about how to obtain the CLIENT_ID and ACCESS_TOKEN in the Exchanging the Refresh Token for an Access Token section above. On https://openapi.planday.com/ you can find all the information you need to make a call to any Planday Open API endpoint (URL, HTTP Method, Body etc.). Here is a sample request, which fetches all departments from the Planday portal the application is defined in:
GET https://openapi.planday.com/hr/v1/Departments
Request headers:
X-ClientId: CLIENT_ID
Authorization: Bearer ACCESS_TOKEN
CURL:
curl -X GET \
-H "Authorization: Bearer ACCESS_TOKEN" \
-H "X-ClientId: CLIENT_ID" \
https://openapi.planday.com/hr/v1/Departments